<em>Mac</em>Book项目 2009年学校开始实施<em>Mac</em>Book项目,所有师生配备一本<em>Mac</em>Book,并同步更新了校园无线网络。学校每周进行电脑技术更新,每月发送技术支持资料,极大改变了教学及学习方式。因此2011
2021-06-01 09:32:01
老規矩,先上案例程式碼,我們按照這個案例一步一步的搞定Mybatis原始碼。
public class MybatisApplication {
    public static final String URL = "jdbc:mysql://localhost:3306/mblog";
    public static final String USER = "root";
    public static final String PASSWORD = "123456";

    public static void main(String[] args) {
        String resource = "mybatis-config.xml";
        InputStream inputStream = null;
        SqlSession sqlSession = null;
        try {
            inputStream = Resources.getResourceAsStream(resource);
            SqlSessionFactory sqlSessionFactory = new SqlSessionFactoryBuilder().build(inputStream);
            sqlSession = sqlSessionFactory.openSession();
            UserMapper userMapper = sqlSession.getMapper(UserMapper.class);
            System.out.println(userMapper.selectById(1));

        } catch (Exception e) {
            e.printStackTrace();
        } finally {
            try {
                inputStream.close();
            } catch (IOException e) {
                e.printStackTrace();
            }
            sqlSession.close();
        }
    }
}
前面我們已經講了Mybatis是如何解析相關組態檔的,如果怕迷路,還是建議先看前一篇文章:
繼續開擼~~
SqlSession sqlSession = sqlSessionFactory.openSession();
前面那篇文章已經分析了,這裡的sqlSessionFactory其實就是DefaultSqlSessionFactory。
所以這裡,我們就從DefaultSqlSessionFactory裡的openSession方法開始。
public class DefaultSqlSessionFactory implements SqlSessionFactory {

  private final Configuration configuration;

  public DefaultSqlSessionFactory(Configuration configuration) {
    this.configuration = configuration;
  }
  //建立session,這個方法直接呼叫本類中的另外一個方法
  @Override
  public SqlSession openSession() {
    return openSessionFromDataSource(configuration.getDefaultExecutorType(), null, false);
  }
  //其實是呼叫這個方法
  private SqlSession openSessionFromDataSource(ExecutorType execType, TransactionIsolationLevel level, boolean autoCommit) {
    Transaction tx = null;
    try {
      //對應xml標籤<environments> ,這個在組態檔解析的時候就已經存放到configuration中了。
      final Environment environment = configuration.getEnvironment();
      final TransactionFactory transactionFactory = getTransactionFactoryFromEnvironment(environment);
      tx = transactionFactory.newTransaction(environment.getDataSource(), level, autoCommit);
      //建立一個executor來執行SQL
      final Executor executor = configuration.newExecutor(tx, execType);
      //這裡也說明了,為什麼我們程式碼裡的SqlSession是DefaultSqlSession
      return new DefaultSqlSession(configuration, executor, autoCommit);
    } catch (Exception e) {
      closeTransaction(tx); // may have fetched a connection so lets call close()
      throw ExceptionFactory.wrapException("Error opening session.  Cause: " + e, e);
    } finally {
      ErrorContext.instance().reset();
    }
  }

    private TransactionFactory getTransactionFactoryFromEnvironment(Environment environment) {
        if (environment == null || environment.getTransactionFactory() == null) {
            return new ManagedTransactionFactory();
        }
        return environment.getTransactionFactory();
    }
}
這個方法中的主要內容有:

下面我們就來逐個攻破。
事務工廠型別可以設定為JDBC型別或者MANAGED型別。

JdbcTransactionFactory生產JdbcTransaction。
ManagedTransactionFactory生產ManagedTransaction。
如果設定的JDBC,則會使用Connection物件的commit()、rollback()、close()方法來管理事務。
如果我們設定的是MANAGED,會把事務交給容器來管理,比如JBOSS,Weblogic。因為我們是本地跑的程式,如果設定成MANAGED就會不有任何事務。
但是,如果我們專案中是Spring整合Mybatis,則沒有必要設定事務,因為我們會直接在applicationContext.xml裡設定資料來源和事務管理器,從而覆蓋Mybatis的設定。
呼叫configuration的newExecutor方法建立Executor。
final Executor executor = configuration.newExecutor(tx, execType);
//Configuration中
public Executor newExecutor(Transaction transaction, ExecutorType executorType) {
    executorType = executorType == null ? defaultExecutorType : executorType;
    executorType = executorType == null ? ExecutorType.SIMPLE : executorType;
    Executor executor;
    //第一步
    if (ExecutorType.BATCH == executorType) {
      executor = new BatchExecutor(this, transaction);
    } else if (ExecutorType.REUSE == executorType) {
      executor = new ReuseExecutor(this, transaction);
    } else {
      executor = new SimpleExecutor(this, transaction);
    }
    //第二步
    if (cacheEnabled) {
      executor = new CachingExecutor(executor);
    }
    //第三步
    executor = (Executor) interceptorChain.pluginAll(executor);
    return executor;
}
此方法分三個步驟。
第一步:建立執行器
Executor的基本型別有三種:
public enum ExecutorType {
  SIMPLE, REUSE, BATCH
}
SIMPLE為預設型別。

為什麼要讓抽象類BaseExecutor實現Executor介面,然後讓具體實現類繼承抽象類呢?
這就是模板方法模式的實現。
模板方法模式就是定義一個演演算法骨架,並允許子類為一個或者多個步驟提供實現。模板方法是得子類可以再不改變演演算法結構的情況下,重新定義演演算法的某些步驟。
關於模板方法模式推薦閱讀:
抽象方法是在子類彙總實現的,每種執行器自己實現自己的邏輯,BaseExecutor最終會呼叫到具體的子類中。
抽象方法
protected abstract int doUpdate(MappedStatement ms, Object parameter) throws SQLException;

protected abstract List<BatchResult> doFlushStatements(boolean isRollback) throws SQLException;

protected abstract <E> List<E> doQuery(MappedStatement ms, Object parameter, RowBounds rowBounds, ResultHandler resultHandler, BoundSql boundSql) throws SQLException;

protected abstract <E> Cursor<E> doQueryCursor(MappedStatement ms, Object parameter, RowBounds rowBounds, BoundSql boundSql)  throws SQLException;
第二步:快取裝飾
在上面程式碼中的第二步
if (cacheEnabled) {
      executor = new CachingExecutor(executor);
}
如果cacheEnabled=true,會用裝飾器設計模式對Executor進行裝飾。
第三步:外掛代理
快取裝飾完後,就會執行
executor = (Executor) interceptorChain.pluginAll(executor);
這裡會對 Executor 植入外掛邏輯。
比如:分頁外掛中就需要把外掛植入的Executor
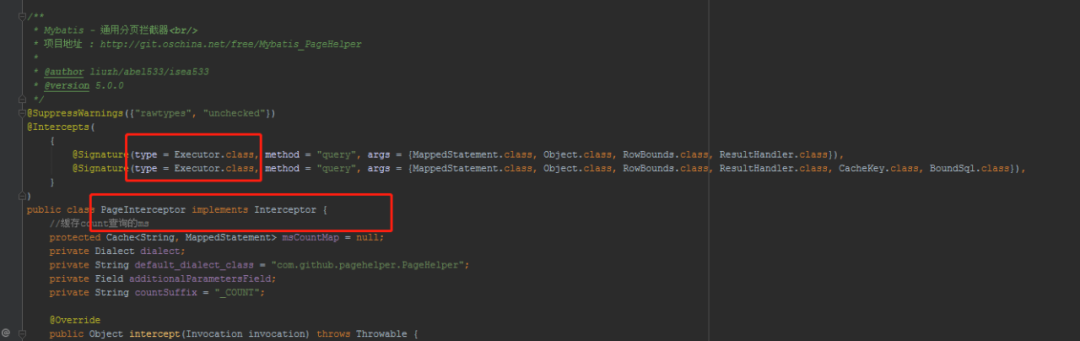
好了,到此,執行器建立的就搞定了。
把前面解析組態檔建立的Configuration物件和建立的執行器Executor賦給DefaultSqlSession中的屬性。
public DefaultSqlSession(Configuration configuration, Executor executor, boolean autoCommit) {
  this.configuration = configuration;
  this.executor = executor;
  this.dirty = false;
  this.autoCommit = autoCommit;
}
到這裡,SqlSession(DefaultSqlSession)物件就建立完畢。
本文我們講了如何建立SqlSession的幾個步驟,最後我們獲得一個DefaultSqlSession物件,裡面包含了執行器Executor和設定物件Configuration。Executor是SQL的實際執行物件。Configuration裡儲存著組態檔內容。
本文原始碼分析的整個流程如下圖:

到此這篇關於Mybatis SqlSession詳解的文章就介紹到這了,更多相關Mybatis SqlSession內容請搜尋it145.com以前的文章或繼續瀏覽下面的相關文章希望大家以後多多支援it145.com!
相關文章

<em>Mac</em>Book项目 2009年学校开始实施<em>Mac</em>Book项目,所有师生配备一本<em>Mac</em>Book,并同步更新了校园无线网络。学校每周进行电脑技术更新,每月发送技术支持资料,极大改变了教学及学习方式。因此2011
2021-06-01 09:32:01
综合看Anker超能充系列的性价比很高,并且与不仅和iPhone12/苹果<em>Mac</em>Book很配,而且适合多设备充电需求的日常使用或差旅场景,不管是安卓还是Switch同样也能用得上它,希望这次分享能给准备购入充电器的小伙伴们有所
2021-06-01 09:31:42
除了L4WUDU与吴亦凡已经多次共事,成为了明面上的厂牌成员,吴亦凡还曾带领20XXCLUB全队参加2020年的一场音乐节,这也是20XXCLUB首次全员合照,王嗣尧Turbo、陈彦希Regi、<em>Mac</em> Ova Seas、林渝植等人全部出场。然而让
2021-06-01 09:31:34
目前应用IPFS的机构:1 谷歌<em>浏览器</em>支持IPFS分布式协议 2 万维网 (历史档案博物馆)数据库 3 火狐<em>浏览器</em>支持 IPFS分布式协议 4 EOS 等数字货币数据存储 5 美国国会图书馆,历史资料永久保存在 IPFS 6 加
2021-06-01 09:31:24
开拓者的车机是兼容苹果和<em>安卓</em>,虽然我不怎么用,但确实兼顾了我家人的很多需求:副驾的门板还配有解锁开关,有的时候老婆开车,下车的时候偶尔会忘记解锁,我在副驾驶可以自己开门:第二排设计很好,不仅配置了一个很大的
2021-06-01 09:30:48
不仅是<em>安卓</em>手机,苹果手机的降价力度也是前所未有了,iPhone12也“跳水价”了,发布价是6799元,如今已经跌至5308元,降价幅度超过1400元,最新定价确认了。iPhone12是苹果首款5G手机,同时也是全球首款5nm芯片的智能机,它
2021-06-01 09:30:45